Finally I purchased a Raspberry PI, I have to admit that this device is very power full and there is so much you can do with it. Once I complete any project I will share with you the complete Tutorial. As for now I’m going to explain how it is easy to setup a raspberry Pi and Install OS .
What I’m trying to do
- How To install an OS on Raspberry Pi
- How to configure and access your Raspberry
- Extra configuration (Remote access)
Enviroment
- I’m using macOS Sierra
Prerequisite
- Raspberry PI
- SD CARD, at least 4GB.
- Keyboard and Mouse.
- Ethernet cord or Wifi dongle (depending on the raspberry pi version).
- HDMI cable (also depending on the raspberry pi version).
- PS: Older version of Raspberry Pi needs a wifi and Bleutooth module. Unlike the latest version of raspberry pi (Raspberry PI 3) which has builtin Bluetooth and wi-fi.
Basic Steps
1.Download and Prepare OS
In this tutorial we will install Raspbian which is the most common and recommended OS for the Raspberry pi.
Raspbian comes with two flavors :
- Raspbian: this the full version of the operating system , and it is the mostly used version. it comes with pre-installed apps that are super useful while using the Raspi.
- Raspbian Lite: it is the light version of the operation system above, it has minimal and basic app installed just to get you going.it has no desktop graphical interface which is ideal if you want to save system resources.
- Noobs: this OS is dedicated for super newbies
- Others: Ubuntu mate, windows 10 iot core
In this tutorial I will only explain the instalation of Raspbian. as I mentioned before, it is the most commonly used. other OS installation would be almost the same.
- First you need to download the OS from the official website; you can download from direct link and torrent.
- Once downloaded, unzip the downloaded archive, to get the .img file.
- Download and install the software that will write the OS image to the SD card. I highly recommend using Etcher to copy that image. it works in all platforms (Linux, Mac and Windows)
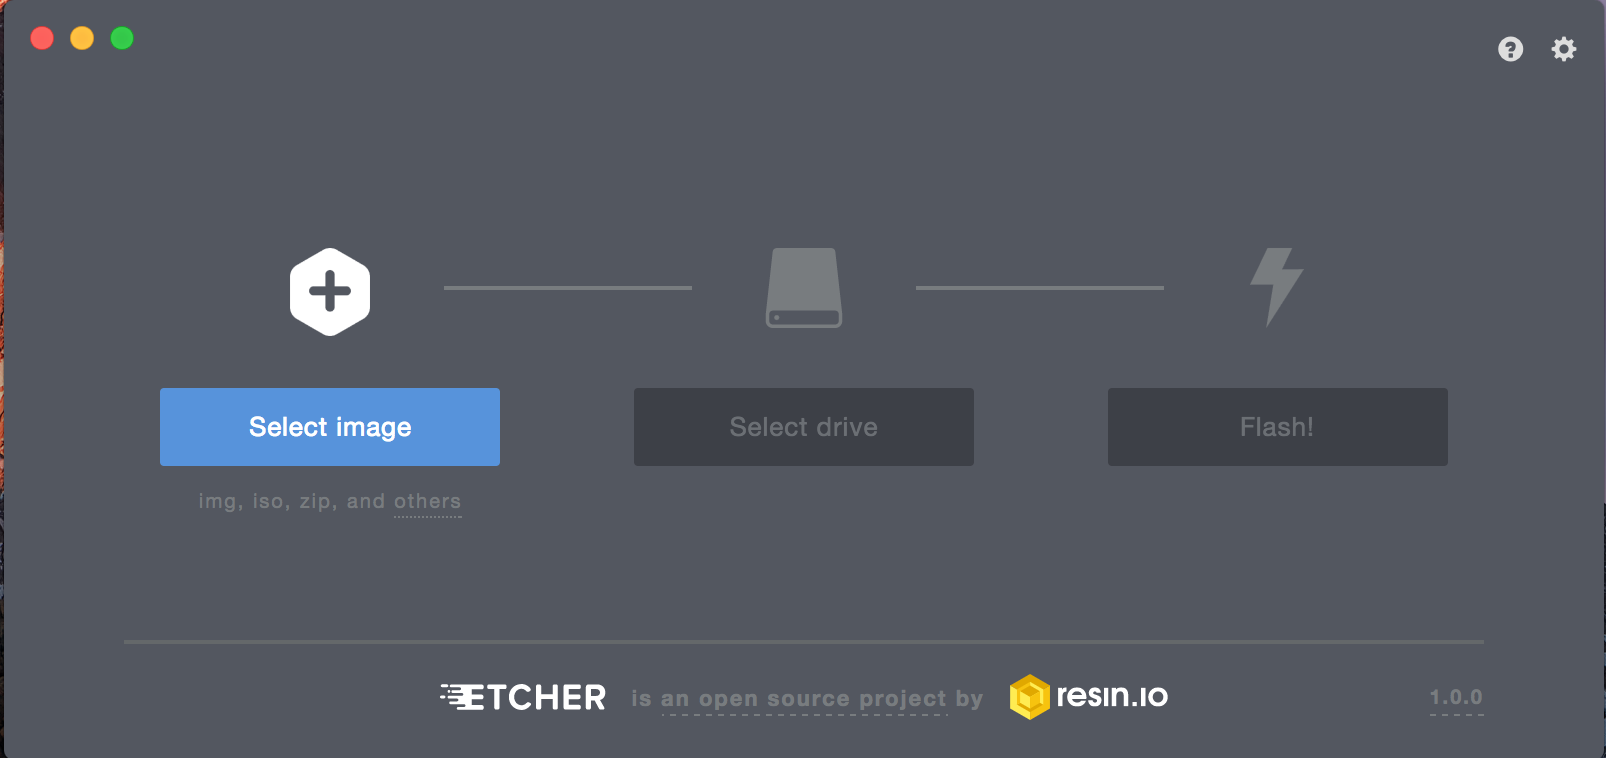
- Select the image and hit flash.
2.Installation of OS
Now your Raspbian image is ready, it’s time to put that sd card in the raspberry pi and power on.
The card reader is in the bottom of the raspberry PI. see the picture below.
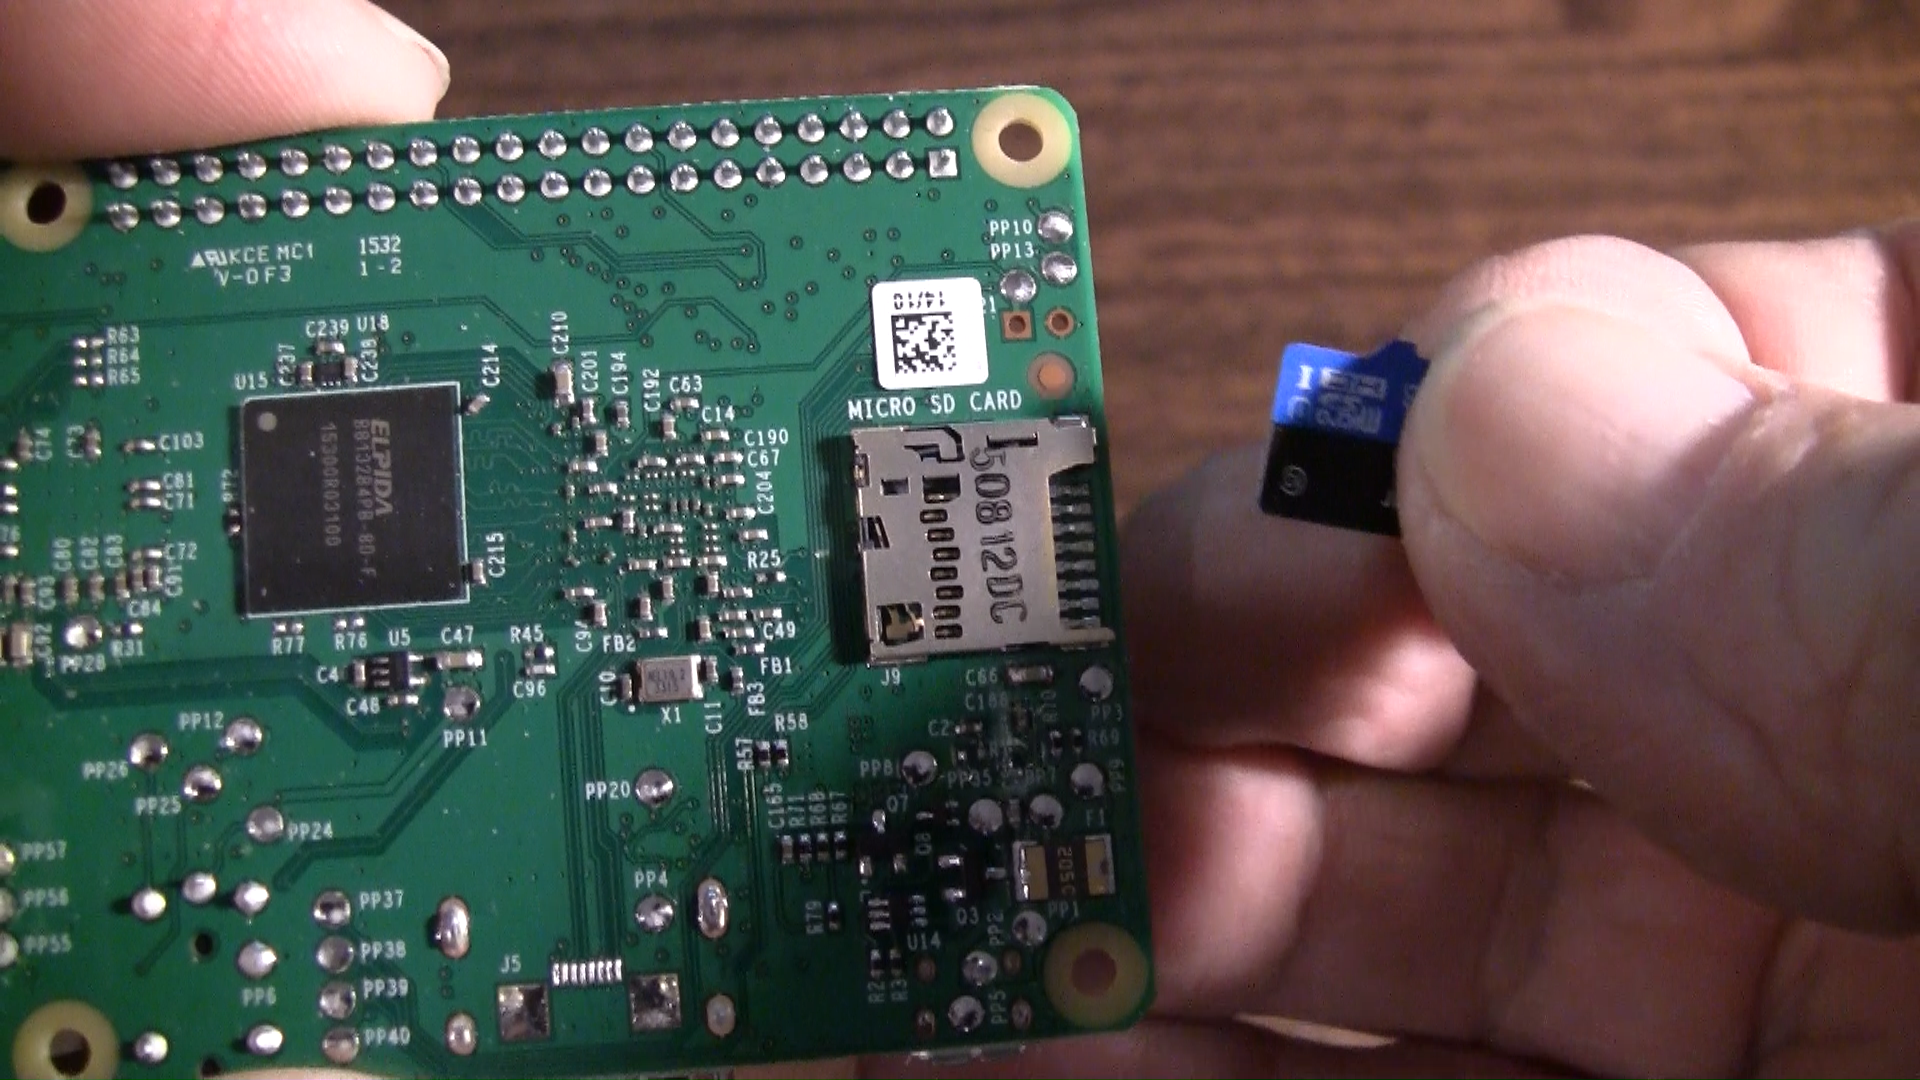
Also make sure that your mouse, keyboard and HDMI cable are connected to the raspberry pi.
3.Basic Raspbian configuration
Depending on which version of OS you have chosen, the installation workflow is pretty much clear and straight forward.
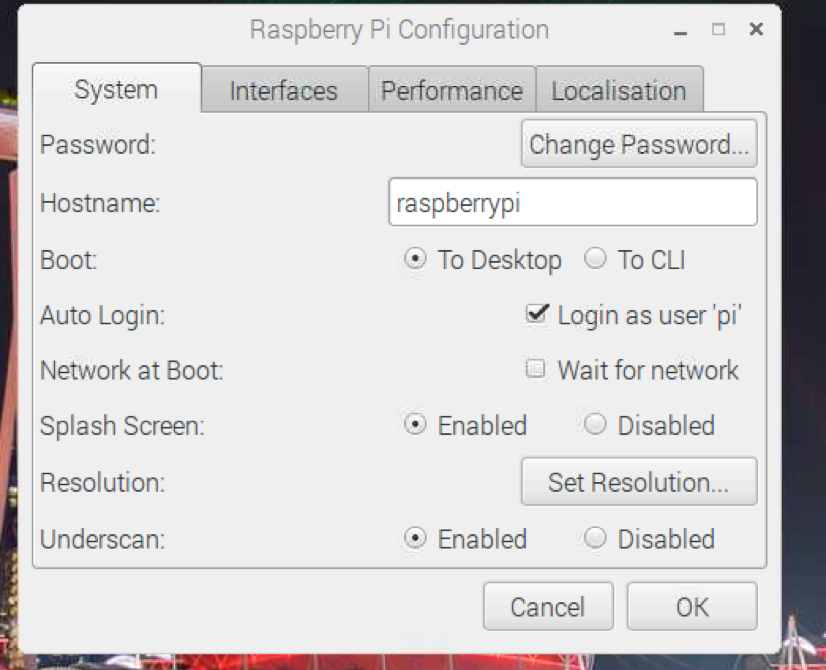
After finishing the installation, there is a some basic configurations you need to make. these configurations are optional, but highly recommended after a fresh install.
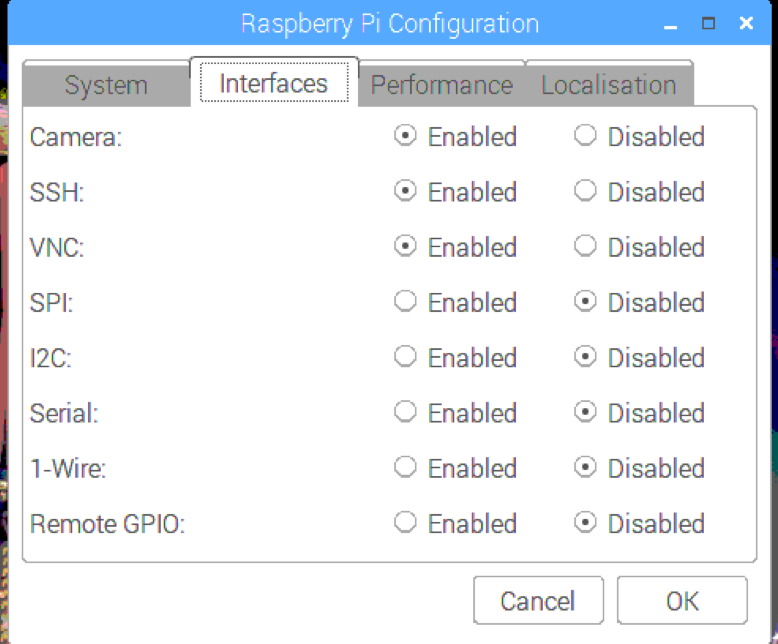
- Open the Raspberry Pi configuration menu, either by going to menu icon -> preferences -> Raspberry Pi configuration.
or
$ sudo raspi-config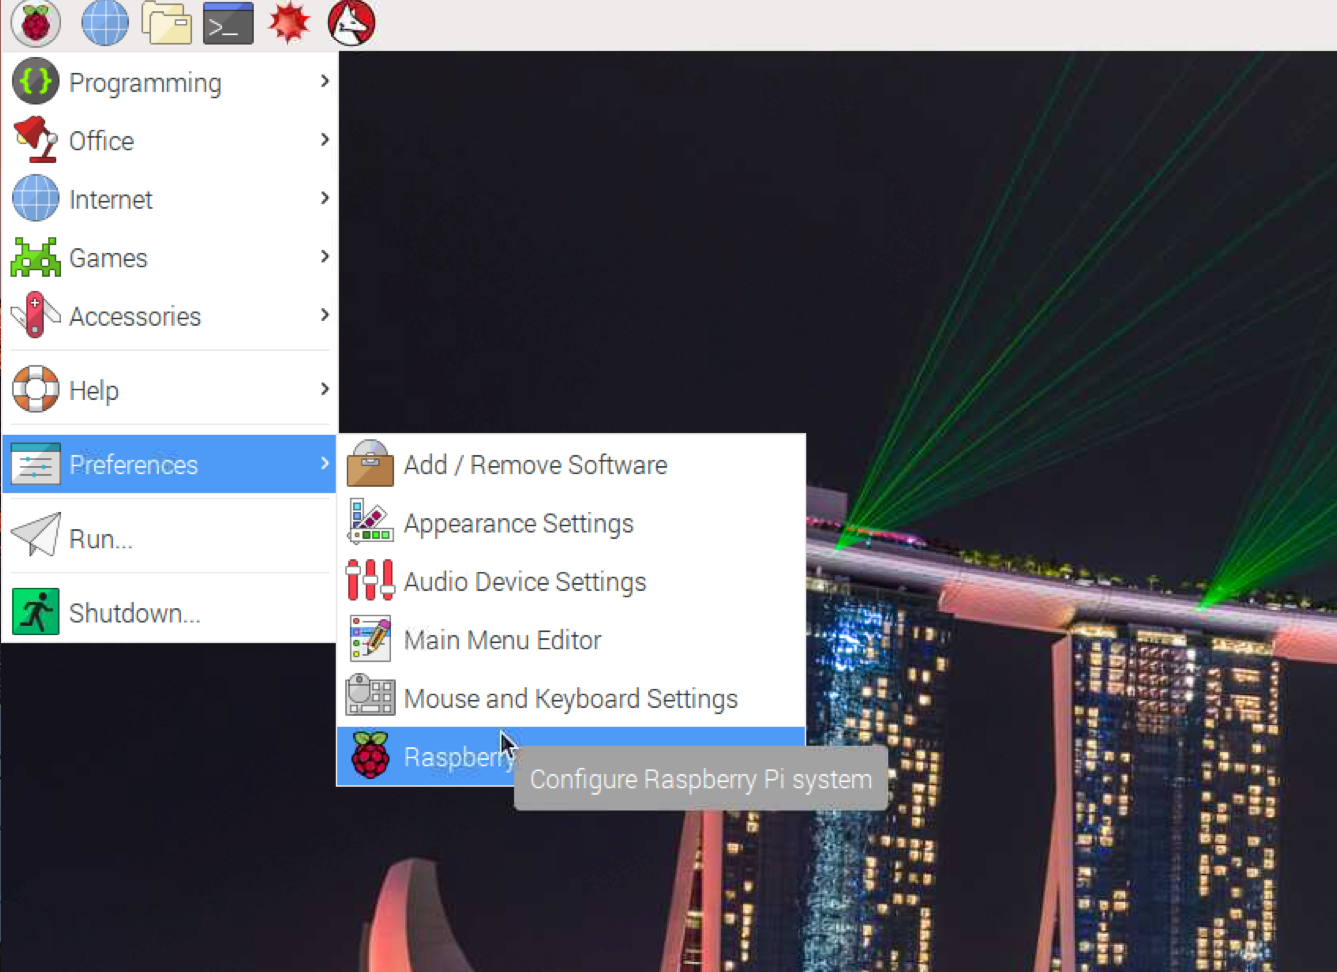
- Expand Filesystem: This will allows the OS to take up the entire SD card.
- Change the default password which is
raspberryand the default usernamepi - You may also want to turn off auto login if you don’t want someone to simply turn on the pi and have access.
- You can also change the username and password from the terminal by using the following command.
$ passwd- Enable SSH and VNC: this enables accessing to raspberry via another computer.
4.Extra configuration
Remote Access
This is optional, but personally i like to access my raspberry pi, when I m not home. to do this, first I fix an address IP to the raspberry pi using my router configuration (DHCP configuration).
Then I enable port forwarding on port 22, which is the default port for SSH connection.
I also enable port forwarding on port 5900, which is the default port of VNC connection.
My configuration on my router looks like this
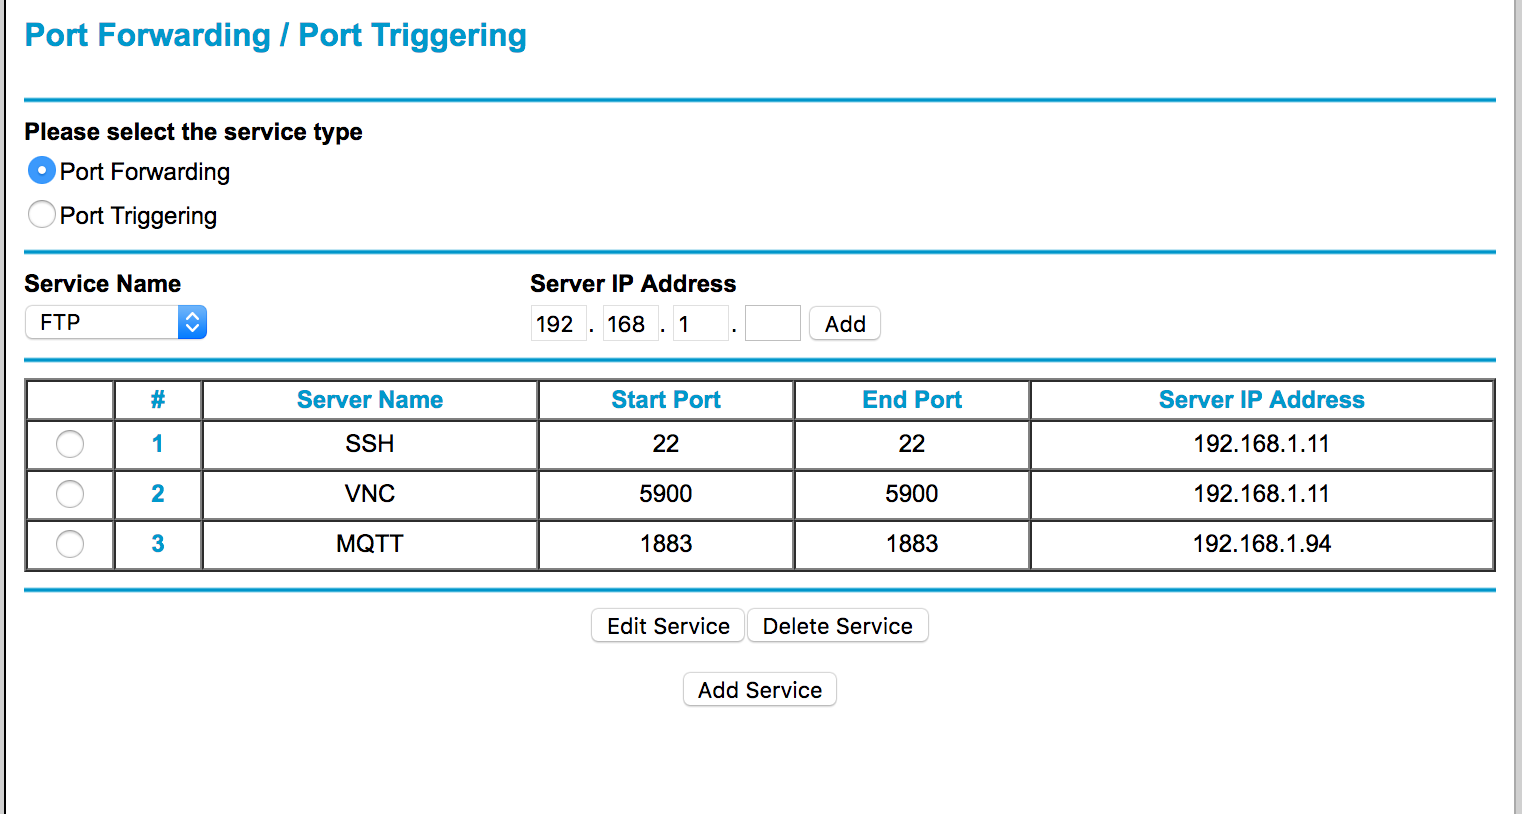
192.168.1.11 : is the local ip of my raspberry pi. you can get the ip address of your raspi by running
$ ifconfigThe ip address is inet addr depending on which interface you used to connect.
so instead of sshing to my raspberry pi using the local ip of my network
$ ssh rasp@192.168.1.11I run the following
$ ssh rasp@10.10.10.10 10.10.10.10: is the public ip of my home network. note if you don’t have a static/public ip, this ip address will change every time you restart or disconnect your router.
The same goes for VNC.
Security
As our raspberry pi open to public (internet), we might want to protect it more carefully. I know that we have already explained how to change the username and password, but that’s not enough. We need something more secure, than a plain username/password.
To achieve this we have to use SSH authentication using a permission file.
First we need to create a public and private key.
On your raspberry pi run the following command ssh-keygen -t rsa, click enter for default file path, and enter for empty passphrase.
$ ssh-keygen -t rsa
Generating public/private rsa key pair.
Enter file in which to save the key (/home/pi/.ssh/id_rsa):
Enter passphrase (empty for no passphrase):
Enter same passphrase again:
Your identification has been saved in /home/pi/.ssh/id_rsa.
Your public key has been saved in /home/pi/.ssh/id_rsa.pub.
Now we need to copy the content of the public key and save it into the host machine (Not the raspberry pi).
$ cd ~/.ssh
$ cat id_rsa.pub
Copy the content of id_rsa.pub and go to your machine (my Macbook, in my case)
$ cd ~/.ssh
$ echo "copied content" > id_rsa.pub
And now login to your raspberry pi using the public key
$ ssh -i id_rsa.pub mypi@10.10.10.10Enjoy working with your raspberry pi.
I will try to post some articles of Raspberry project I make.

Comments